Fish painted coaster
This project is created with Etch cream in a Needle tip applicator bottle and a design from a clip-art book. You can also use a picture from a coloring book.
Materials
- Armour Etch Glass Etching Cream
- Square Coaster Set
- Rub N Buff 5pk- (We used Emerald green)
- 61-4162 Needle Tip Applicator bottle
Additional Materials
Directions
Preparation and Usage Starting Skills
Project Steps
- Tape a copy of your clip-art design to the underside of the coaster with design showing through the front.
- With the popsicle stick, load the Needle tip applicator bottle with Etch cream.
- Snip off the smallest amount of the tip you can from the applicator bottle. If the cream won't come out the tip, snip a tiny bit more off the end until the cream makes a nice line. You want as fine a line as you can get without the Etch cream clogging the tip. Keep an opened paper clip or embroidery needle handy to handle clogs as you are working.
- Outline the design first, then go back and fill in details. You will have to work quickly, the Etch Cream should be removed within 5 minutes or so. You may have to eliminate some lines to keep the design simple or you can make finer lines with a liner paintbrush (do not wet with water) by dragging etch cream from the applicator bottle lines. Remember, Etch cream is not paint, so you cannot correct mistakes, so think before you create a line! Practice on scrap glass first!
- Rinse off Etch Cream under running water without touching the design until most of the cream is removed. Wash off any remaining cream with a wet paper towel while water is still running. Dry coaster. View the directions and How To Videos.
- Place a little Green Rub N Buff on the end of a cotton swap and smear all over the etching.
- Take a soft paper towel and wipe off the excess Rub N Buff, flip towel and buff to a luster. The Rub N Buff will on stick to the etching.
Article Posted: 06/04/2013 03:48:26 PM
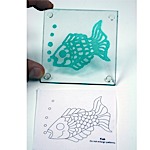 Fish painted coaster
This project is created with Etch cream in a Needle tip applicator bottle and a design from a clip-art book. You can also use a picture from a coloring book.
Fish painted coaster
This project is created with Etch cream in a Needle tip applicator bottle and a design from a clip-art book. You can also use a picture from a coloring book.

