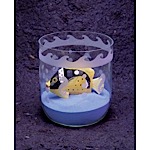
Fish bowl
Here is a fun summertime project for the whole family. Turn a large jug or bottle into a fish bowl using the Bottle and Jar cutter. Etch with waves and seahorses, fill the bottom with colorful beach sand or fish tank gravel and display with some handsome replicas of fish
Materials
- 15-0200 Armour Etch Glass Etching Cream
- 19-2701 Etch Bath Stencil Sheet-CIRCLES AND SQUARES
- 21-1634 Over N Over Stencil-SEASHORE
- 31-0401 Beige vinyl masking
- 77-7721 Armour Bottle and Jar Cutter
- 85-2171 Sponge Brushes
- Cutting Mat
- Large Clear Glass Bottle - vinegar, wine or cider bottle
- Colored Sand
- Decorative Fish
- Pencil
- Card Stock
- Sewers Soft Tape Measure
- Newspaper
- Eye Protection
- Canvas Gloves (gardening type work well)
Additional Materials
Directions
Preparation and Usage Starting Skills
Project Steps
- Put on the cotton gloves and eye protection.
Follow the instructions that came with your Bottle and Jar cutter for assembly and setting up the bottle for cutting. Wipe off excess oil from the cutting wheel with a paper towel.
- Score the bottle at the desired height you would like your bowl to be. Make you cut high enough so both the wave and seahorses will fit 2 inches above the bottom (top of sand level).
- Gently sand off the sharp edges around the rim of the bowl with the sandpaper provided in your kit. Once smooth, clean the bottle with glass cleaner.
- Measure the circumference of the bottle using a tape measure. If you do not have a tape measure, take a piece of string, wrap around bottle and measure the string on a ruler.
- Cut a strip of both cardboard and vinyl 4 inches wide x the length measurement of the bowl using a straight edge or ruler, plus 1 inch. Also cut a piece of cardboard 4 x 4 inches
- Draw a single wave across the top of the 4x4 inch piece of cardboard using the picture as a reference. Cut the wave out. Re-trace the wave repeatedly along the longer strip of cardboard and cut out. This is your wave template
- Place the strip of beige vinyl masking paper side up. Line up the wave template along the bottom edge of the strip. Place the wave template on the paper side with the waves in the opposite direction than you want them to go.Trace the waves onto the paper.
- Cut out the waves using either scissors or a craft knife. Take the top half of the strip you cut (hollowed out waves) and remove the paper backing. Line up the top straight edge of the vinyl strip with the rim of the bowl and smooth it down around the rim.
- Take the other half of the vinyl strip and trim off the waves. Turn the strip upside down (it should have a straighter edge than the side you cut the waves from) and apply 1 to 1.5 inches below the first strip. You should now have a wave stencil like our project
- Measure 2 inches up from the bottom of the bowl and apply a strip of masking tape. Apply more overlapping strips of tape below the 2 inch line all the way to the bottom of the bowl.
- Place a few seahorses, dolphins or seashells in the open area between the waves and the tape at the bottom.
- Apply some small circle stencils around the bowl between the seahorses using the Etch Bath stencils. You want the square part with the circle in the middle. Remove the circle dot so it is open and you will be using only the rectangle outer part.
- Cover all exposed areas of the glass in between the seahorse stencils and circle stencils that you do not want etched. Make sure the tape strips are overlapping both the tape and stencils
- Put on the rubber disposable gloves. Load the foam brush into the etching cream. it should be full, but not dripping. Wipe the brush across the opening of the bottle to remove any excess cream so it does not drip. PAT the Etch Cream onto the stencils (do not brush on the cream like you are painting) until all the stencil areas are covered completely with a thick layer of cream. Leave Etch cream on 5 minutes.
- Turn bowl upside down and rinse under running water so no etch cream water runs inside the bowl. Rinse off all the Etch Cream. Remove all masking and stencils and rinse again. Dry bowl completely.
- Fill the bottom of the bowl with 2 inches of colored sand or gravel, place in the decorative fish.
Suggestions:
You could layer different colors of sand in the bottom either just in layers or make some sand art.
Add bits of coral, driftwood, seashells, pearls other decorative creatures like crabs, lobsters, a mermaid or sea turtles to the sand.
Add fish tank miniatures like a pirate chest or ship, skeleton, etc
Article Posted: 05/08/2017 01:08:23 PM
 Fish bowl
This whimsical fish is maintenance free!
Fish bowl
This whimsical fish is maintenance free!


